In this article I want to explore infrastructure creation in AWS using Terraform modules (IaC), building and deploying PHP applications with the help of Jenkins (using Publish-Over-SSH plugin) and Ansible .
This is what I will cover in this article:
- Tool introduction.
- Terraform installation.
- Let’s start with the coding.
- Devops continuous integration/ continuous development (CI/CD) setup for PHP applications.
- Let’s run the demo!
- Common issues, along with troubleshooting steps.
Tool introduction
Terraform is an infrastructure as code (IaC) tool which helps provision and manage infrastructure. It’scloud agnostic and it supports some of the famous public cloud vendors (AWS, GCP, Azure, OpenStack, etc.). Here we will be using AWS as the cloud provider.
Jenkins is a free and open source automation server. It helps automate the stages of software development related to building, testing and deploying, facilitating continuous integration and continuous delivery.
Ansible is an open-source tool for software provisioning, configuration management and application deployment to implement Infrastructure as Code (IaC). It runs on many flavors of unix/linux and can be used to configure unix based as well as windows based machines.
Terraform installation
- Download Terraform from https://www.terraform.io/downloads.html (here we’ve installed windows 64 bit version 14.2 on C:\)
- In-order to run your terraform script from any location setup the path variable as below:
Go to Control Panel->System and Security->System->Advanced system setting then click on the environment variable and edit path “c:\” where we have extracted our terraform setup.
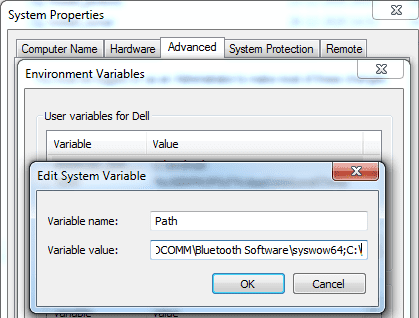
3. Open command prompt type terraform — version.
- Terraform modules: We can create modules to reuse code for multiple accounts .
- We will be creating the following modules for infrastructure setup:
-EC2: Jenkins server, Ansible, Target Server.
-OS: Ubuntu
-RDS: MYSQL
File structure for this demo :
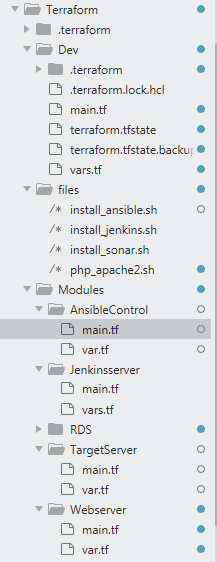
Provision Jenkins, Ansible, Tomcat and RDS setup using Terraform module.
The prerequisites for creating an Instance module are:
- IAM profile: An IAM profile acts as a container for EC2 instance’s IAM role. If you create EC2 from the console, it will automatically attach an IAM profile with EC2 role. However while creating through CLI or API, you need to create roles and instance profiles as separate actions.
- IAM Role: It’s an IAM identity that you can create in your account which has specific permissions.
- IAM Policy: It defines permission for an action regardless of the method that you use to perform the operation.
- Security Group: It’s like a firewall, which defines allow/deny actions to the EC2 instance traffic.
- AMI: It is a preconfigured package required to launch an EC2 instance that includes the OS and other required software packages.
- User data: When you launch an instance in Amazon EC2, you have the option to move user data to the instance, which can be used to perform common automated configuration tasks and even run scripts after the instance starts.
- Keyname: It’s a set of security credentials that you use to prove your identity when connecting to an instance. Download the key from the console and pass as a variable.
- Instance type: It’s the type of instance to start. Updates to this field will trigger a stop/start of the EC2 instance.
Let’s start with the coding
→resource “aws_instance” creates an aws_instance which terraform would refer to as ansiserver.
→Pass ami and key name as variable that will be defined in vars.tf, instance type will be t2.micro.
→Under user data pass shell script file location.
→Tags will create an instance named ansible, associate_public_ip = true is optional which will associate public ip to EC2 instance.
resource “aws_instance” “ansiserver” {
ami = “${var.ansi_ami_id}”
instance_type = “t2.micro”
key_name = “${var.keyname}”
vpc_security_group_ids = [aws_security_group.ansiserver.id]
iam_instance_profile = “${aws_iam_instance_profile.ansi_profile.id}”
user_data = file(“C:/Users/Dell/Terraform/files/install_ansible.sh”)
associate_public_ip_address = true
tags = {
Name = “ansible”
}
}
→resource “aws_security_group” will create a security group named “ansiserver” .
→vpc_id is passed as a variable.
→While creating the AWS instance, a security group is created initially which attaches the security group id to the above instance as vpc_security_group_ids .
resource “aws_security_group” “ansiserver” {
name = “ansiserver”
description = “Allow SSH and Jenkins inbound traffic”
vpc_id = “${var.vpcid}”
ingress {
from_port = 22
to_port = 22
protocol = “tcp”
cidr_blocks = [“0.0.0.0/0”]
}
ingress {
from_port = 8080
to_port = 8080
protocol = “tcp”
cidr_blocks = [“0.0.0.0/0”]
}
ingress {
from_port = 0
to_port = 0
protocol = “-1”
cidr_blocks = [“0.0.0.0/0”]
}
egress {
from_port = 0
to_port = 0
protocol = “-1”
cidr_blocks = [“0.0.0.0/0”]
}
}
→resource “aws_iam_role” will create an IAM role named ansi_role which allows EC2 instances to call AWS services using sts assume role on the user’s behalf.
→IAM role policy attachment as name suggests, attaches policy to ansi_role.
→Count is Meta-argument which is used to manage several similar objects without writing separate blocks.
→ In this example we will count the length of variable “policy arn”, attach AWS managed policy to ansi_role.
→Count.index is a distinct index number which starts with 0, as we have two arns passed in variable (refer var.tf below) count.index will attach each arns to our role.
resource “aws_iam_role” “ansi_role” {
name = “ansi_role”
assume_role_policy = <<EOF
{
“Version”: “2012–10–17”,
“Statement”: [
{
“Action”: “sts:AssumeRole”,
“Principal”: {
“Service”: “ec2.amazonaws.com”
},
“Effect”: “Allow”,
“Sid”: “”
}
]
}
EOF
}
resource “aws_iam_role_policy_attachment” “role-attach” {
role = aws_iam_role.ansi_role.name
count = “${length(var.iam_policy_arn)}”
policy_arn = “${var.iam_policy_arn[count.index]}”
}
resource “aws_iam_instance_profile” “ansi_profile”{
name = “ansi_profile”
role = “${aws_iam_role.ansi_role.name}”
}
The final code can be referred on the github account:
https://github.com/vriksha-star/Terraform.git
→Similarly, code for other terraform modules such as RDS, Jenkins, Target server can be found in the Github repos under Modules directory.
→Shell scripts used to create Jenkins, Ansible and target servers will be under the files folder on theGithub account.
Below are the contents of main.tf created under Dev folder, under which you need to initialize terraform:
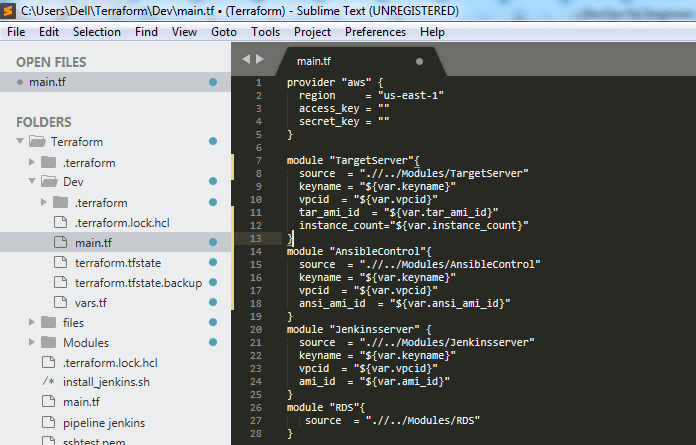
Using Terraform
→Go to command prompt, scroll towards the main folder where modules are defined and perform terraform init. Thenyou will get an output as below:
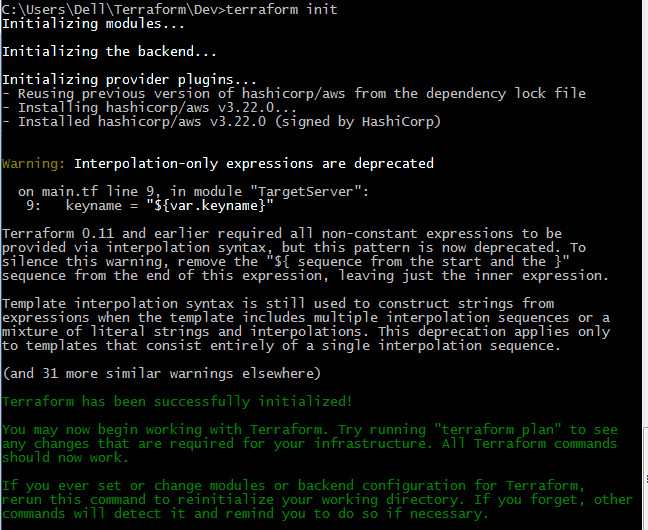
→Execute below commands after terraform init as
– terraform-plan (This gives the blueprint about resources)
– terraform-apply (This applies the terraform configuration and creates the resources)
→Once terraform application is successful, it creates Targetserver-1, Targetserver-2, ansible (controller), Jenkins server and RDS database1 in your AWS account as shown in the below picture.

Devops CI/CD setup for a PHP application
→Use the PHP application from AWS documentation from this URL. I have kept a copy of it in my GitHub repo.
→Login to Jenkins Console.
→Connect Jenkins to Ansible using Publish-over-ssh. Then, on Jenkins go to Available, then manage plugin and add the Publish-over-ssh plugin and run the installation without restarting.
→Then go to the option configure systems and add the private key from Ansible server using ssh-keygen.
→Add public key from Jenkins to authorized files on Ansible master and then check the connection.
→If this doesn’t work add the contents of the .pem key as a private key under configure systems.
Configure Ansible with Jenkins using publish over ssh:
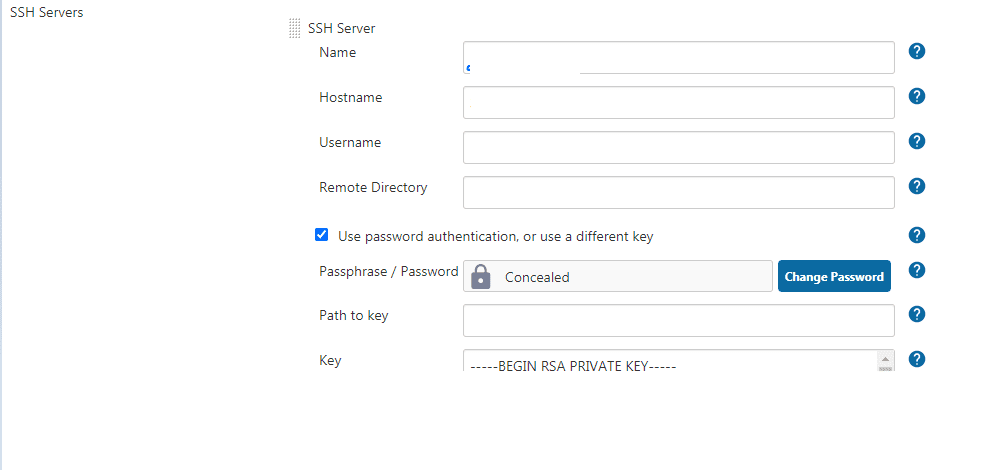
→You can connect Ansible controllers and targets by copying the public key from Ansible controller to authorized keys on Ansible target.
→On Ansible controller machine, create a file named inventory.txt, add the ip address of target machines and create pingtest.yaml playbook with below contents.


→After writing the playbook, execute the command “ansible-playbook pingtest.yaml -i inventory.txt” which gives output as below:

Create an Ansible playbook on an Ansible controller machine:
- Created file named copyfile.yaml
name: Playbook to deploy app on target Server
hosts: webserver
become: yes
become_user: root
tasks:
– name: Creates directory
file:
path: /var/www/inc
state: directory
mode: 0777
– name: Creates file
file:
path: “/var/www/inc/dbinfo.inc”
state: touch
– name: Creates Content
copy:
content: |
<?php
define(‘DB_SERVER’, ‘db_instance_endpoint’);
define(‘DB_USERNAME’, ‘tutorial_user’);
define(‘DB_PASSWORD’, ‘master password’);
define(‘DB_DATABASE’, ‘sample’);
?>
dest: /var/www/inc/dbinfo
mode: 0777
– name: Copy File to ansible target
copy:
src: /home/ubuntu/SamplePHP.php
dest: /var/www/html
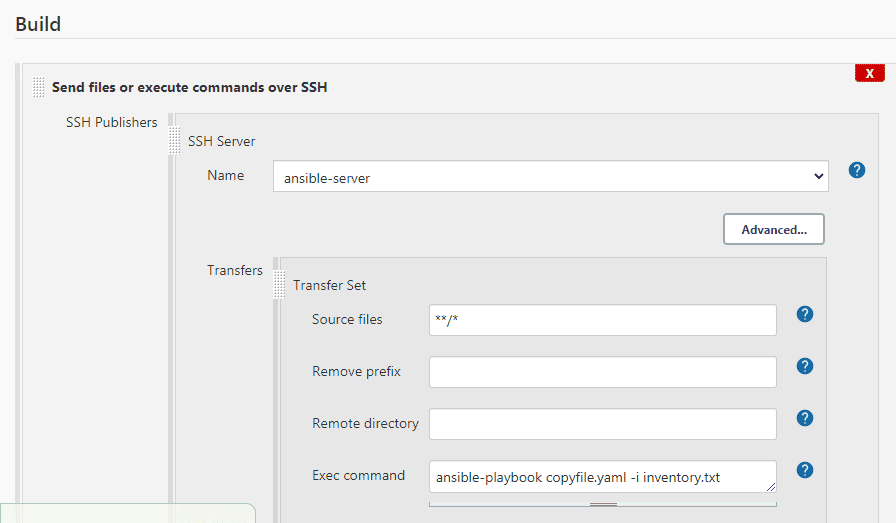
On Jenkins UI perform the following steps:
- Create Freestyle project named “PHP-test” on Jenkins.
- On SCM provide your GIT url:

Let’s run the demo
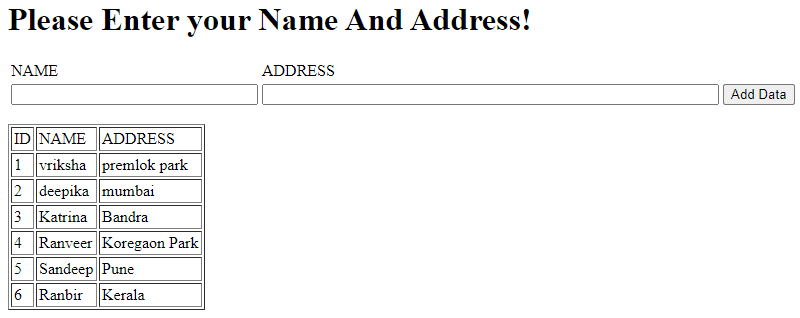
- Trigger Jenkins build, on browser execute http://ec2-public-ip/SamplePHP.php(your php script name), you will get an output as below:
Common issues along with troubleshooting steps:
- In case of build failure check whether copyfile.yaml is created on an Ansible controller.
- Check build status. f you are getting an unstable issue for Jenkins build check test connection on configure systems.
- Update private ip of target server on RDS security group.
- If you get a mysql connectivity issue check connectivity from target to mysql using “telnet “RDS endpoint” 3306”.
- If you get a db issue check dbinfo.inc whether you have provided right db details on” var/www/inc “ on the target machine.
Conclusion
This article was meant to share basic understanding of DevOps CI/CDreal time scenarios, along with automation steps using Terraform , Jenkins, and Ansible modules. We successfully deployed an application with html as the frontend, php as the backend and mysql db as the database.


