Introduction
SageMaker Studio was made available in April 2020 as a new addition to the SageMaker family of products. Its aim is to create a cohesive experience for everyone that works to solve machine learning (ML) problems, including tools for every part of the process in an easily accessible IDE-like UI.
This article is for people new to SageMaker Studio and the JupyterLab environment who want to approach it using a tool that provides a cohesive, integrated experience. We have included links to official documentation and tutorials, with the goal of grouping the most essential information regarding SageMaker studio in one place for the curious novice.
We’ll describe the main features that make working with data easier, covering the following topics:
- Onboarding and sharing
- Performing common tasks in Studio
- Training and experimenting
- Monitoring your models
- Cutting costs
But first: what is SageMaker? SageMaker is a group of services that lets us solve ML problems such as data exploration, model training, model deployment, and monitoring. SageMaker Studio is Amazon Web Services’ interface that brings together the best parts of the service in a single integrated experience. Together with the SageMaker SDK, we can perform the most important parts of a machine learning operation with very little effort.
Related reading:
Onboarding and sharing
SageMaker Studio is designed to onboard new users and set up an environment suitable to work with data in minutes. It also provides a means of sharing notebooks between users.SageMaker Studio users are assigned to a single domain, are assigned user profiles, and have isolated storage spaces where they can store their user files. We’ll explore each of these concepts now, and get a few tips on how to get started today.
What is a SageMaker Studio domain?
From the AWS documentation:
A domain consists of an associated directory, a list of authorized users, and a variety of security, application, policy, and Amazon Virtual Private Cloud (VPC) configurations. An AWS account is limited to one domain per region. Users within a domain can share notebook files and other artifacts with each other.
When creating a domain through the console, only a few options are available. Using the AWS CLI provides a broader scope of options, particularly regarding default user configurations. This can be particularly interesting for users that are looking to customize default instance size for both the Jupyter server and the machines running the kernels.
Domains are the central configuration object in SageMaker Studio. Among other things, they determine how user authentication and authorization work. We have two choices for this:
- IAM allows us to access SageMaker Studio using regular IAM accounts.
- SSO allows the use of AWS Single Sign-On, which is a separate auth service from IAM. Users do not need to have an IAM account to have an SSO account. Please note that SSO is only available on an AWS account which has it enabled.
SageMaker Studio requires an execution role to interact on your behalf with other AWS services. The role must have the AmazonSageMakerFullAccess policy. You can easily create this from the domain creation dialog.
To allow SageMaker Studio access to resources that reside inside of your VPC, you can set your VPC, subnet, and security group here.
Read more about domains:
What are user profiles?
Regarding user profiles, the official documentation defines them as:
A user profile represents a single user within a domain, and is the main way to reference a “person” for the purposes of sharing, reporting, and other user-oriented features.
In other words, domains are simply collections of users. It’s only possible to have one domain at a time per account per region.
SageMaker Studio user profiles are isolated from one another. However, they may need to share files or data at some point. SageMaker Studio allows users to share notebooks.
As soon as you create a SageMaker Studio domain user, you will create an Elastic File System (EFS) volume. This EFS volume will be used to store that user’s files. Each SageMaker Studio user will have their private home folder hosted in this volume, and each time they spin up a Jupyter server instance, their home folder will be mounted seamlessly.
Read more about user profiles:
Creating a SageMaker Studio user
To use SageMaker Studio, you need to create a user for the domain. This user will get assigned compute and storage resources. Depending on which identity provider you pick – AWS Identity and access management (IAM) or AWS Single Sign-on (SSO), you’ll need to follow different steps.
IAM user
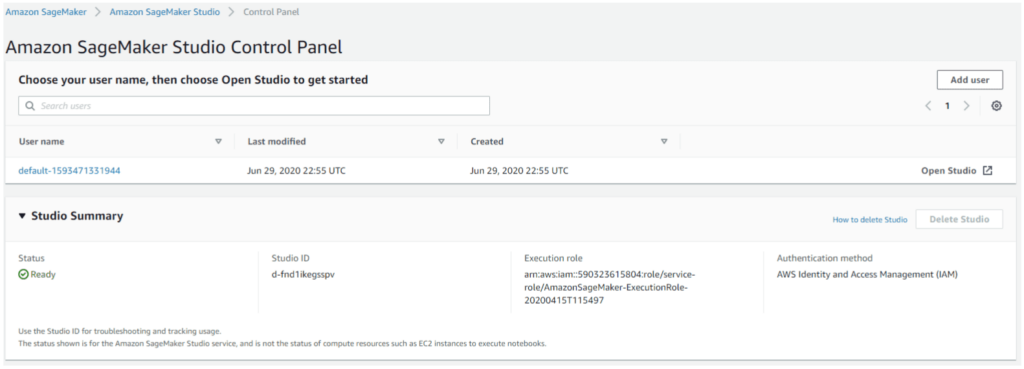
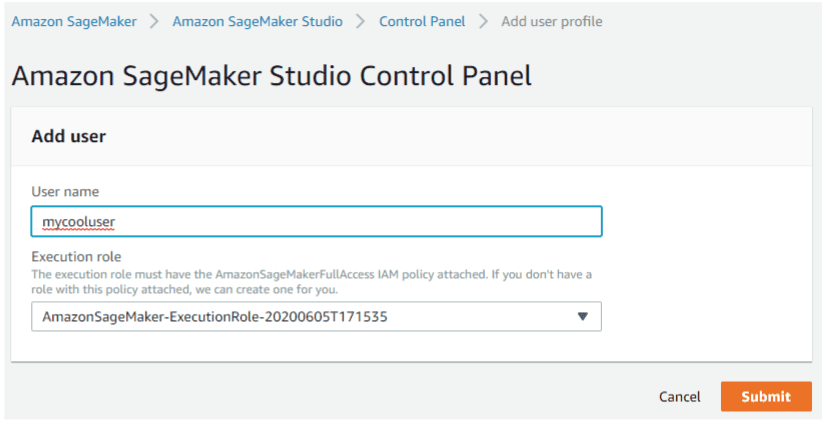
To create a IAM user, in the domain dashboard, click “Add User”, then pick a username and an execution role.

Accessing SageMaker notebooks with pre-signed URLs
Having an IAM account for each of your SageMaker Studio users might introduce administrative overhead that is not compatible with your current workflow. You can still give your users access to all SageMaker Studio’s features by using pre-signed access URLs.
An easy way to do this for the first time is to do so through the AWS CLI tool. However, manually generating URLs should be automatized by some other tool. When you reach that stage, be sure to use one of the many AWS SDKs for the language of your choice. For this example, we’re going to be focusing on the CLI.
A pre-signed URL is a limited time use link that allows you to access SageMaker Studio IDE for a specific user. To generate one, we need a domain ID and a user profile name.
Before you begin remember to be logged in to your AWS account with SageMaker Studio full access permissions.
Step 1: Get domain name and user profile name by running the following command: aws sagemaker list-user-profiles

Step 2: Create the URL
aws sagemaker create-presigned-domain-url –domain-id <your-domain-id> –user-profile-name <your-user-profile-name-here>

Try the pre-signed URL by using an incognito browser window.
Read more on pre-signed domain urls
Single Sign-On
If the intended users for SageMaker Studio do not have an IAM account, other auth methods can be used by enabling AWS SSO. Microsoft Active Directory or SAML 2.0 can be used instead. To use this, make sure the account you’re using SageMaker Studio has SSO enabled. You can read more about the service here.
Enabling SSO
- Login to your AWS account and visit this page
- Click on “Enable AWS SSO”

3. Once SSO is enabled, add a new user by clicking User > Add User

4. Create a user, then make sure you can login with that user in the generated user portal

Creating a SageMaker Studio domain with SSO
- Make sure you don’t have any previously created SageMaker Studio domains
- Pick Standard Setup when creating the new studio, then AWS SSO as the authentication method.
- Create an execution role or reuse one from a previous scenario
- Create the Studio domain.
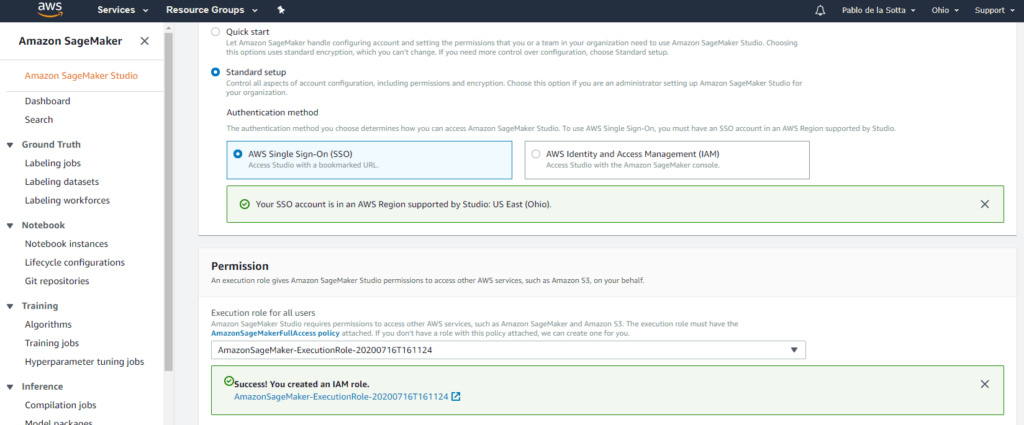
5. Once the domain is created, assign the previously created user to it.
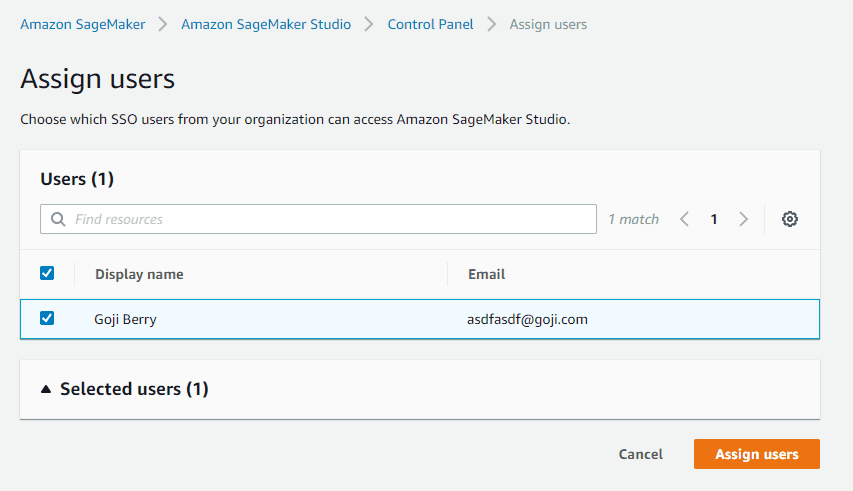
6. To test that the user is currently working, go to the SSO user portal and login. Remember that the user portal URL is generated for you when you enable SSO.
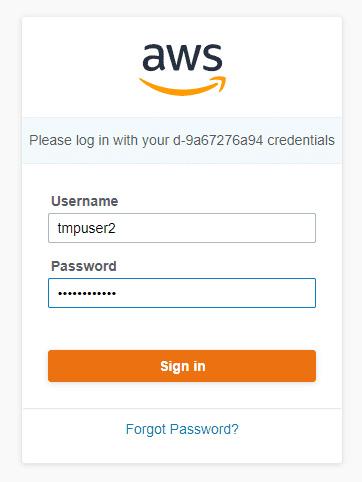
8. You should see that the created user now has the SageMaker Studio application enabled. Click on it to open the SageMaker Studio IDE.

9. This starts the SageMaker Studio Jupyter server. To shut down the server and quit, use File-> Shutdown-> Shutdown All.
Performing common tasks in Studio
SageMaker Studio provides a customized JupyterLabs environment that offers a full IDE experience for data tasks. We’ll now go through some of the UI features and conveniences introduced by this tool.
The sidebar
The sidebar allows quick access to SageMaker studio tools.
- File explorer: shows you the content of your Studio user’s home folder.
- Git: allows you to graphically perform git operations.
- Running terminals and kernels: shows you terminal, kernels and images that are currently open. Handy for closing them.
- Command Palette: searchable command list to customize your IDE and perform common operations.
- SageMaker Experiments: lets you track visually your SageMaker Experiments.
- SageMaker Endpoints: lets you visually monitor your deployed models.
- Tabs: a list of open tabs in your Studio IDE, handy for navigation.
Read more about SageMaker Studio’s UI:
Launchers
A launcher is a page in the IDE that lets us launch an activity.To create a new launcher, use the menu option File -> New Launcher
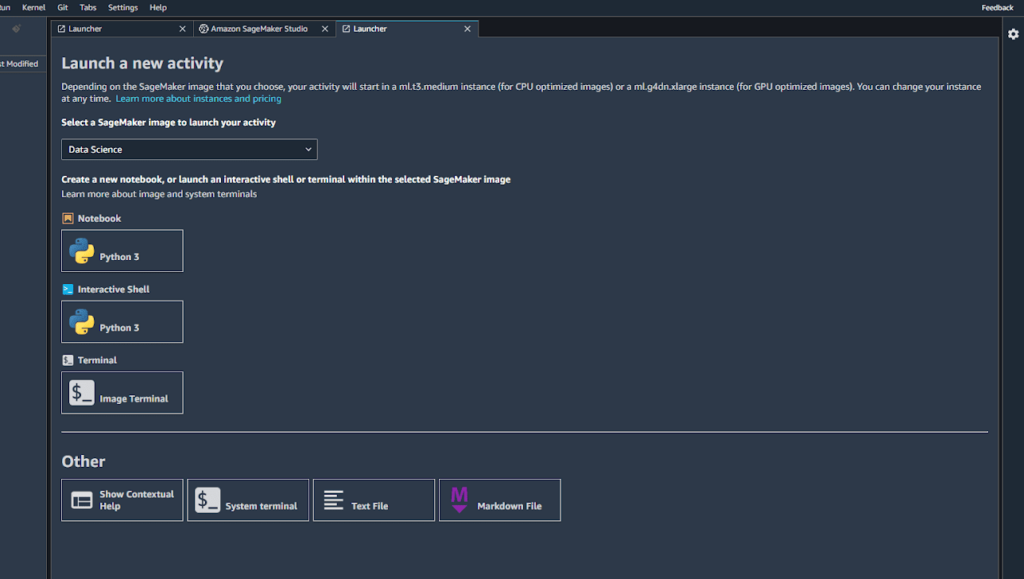
In the Launcher UI, activities are the most common tasks in day-to-day notebook use. We’ll do a brief tour of what is available out of the box.
Starting a notebook – You’ll pick an instance type and image.
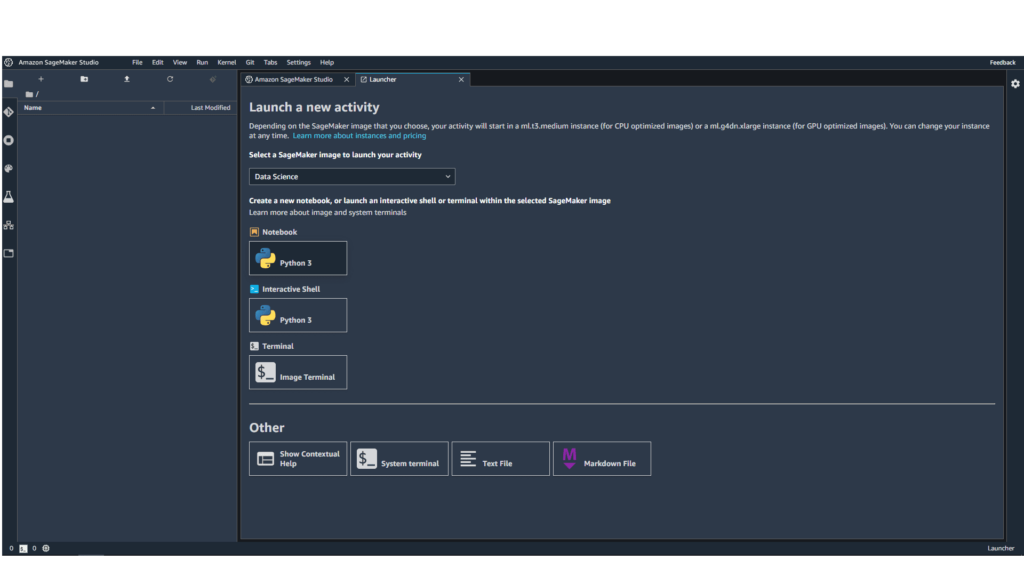
After waiting a little while, you’ll see the new notebook file. Top right you’ll see the instance type and the kernel, which default to ml-t3-medium and Python3 respectively.
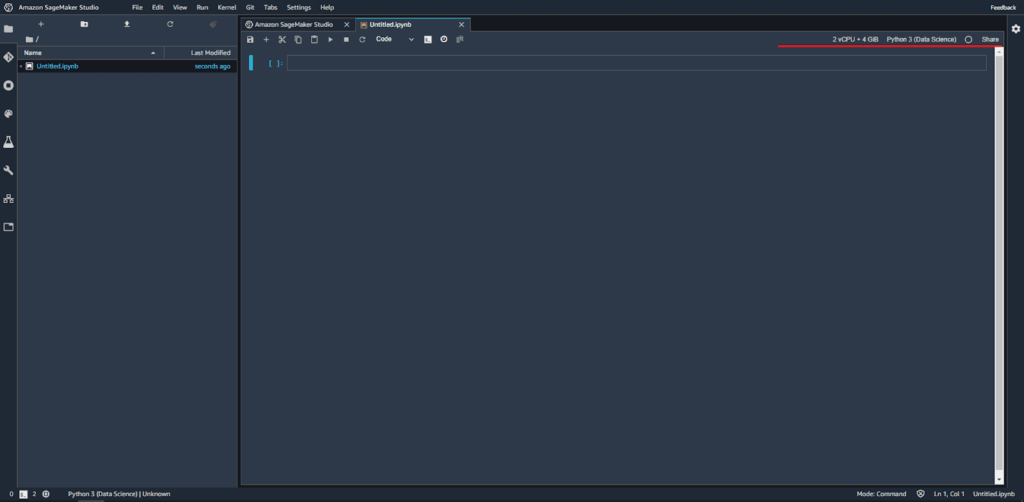
You can click on either to change them to one that better suits your execution needs.
However, be mindful that changing instance types does not terminate the old instance, so when moving to a different instance make sure to kill the previous one.
An easy way of stopping an image is through the sidebar. Clicking shut down in the image in the “Running terminals and kernels” section will stop the image and all kernels running on it.
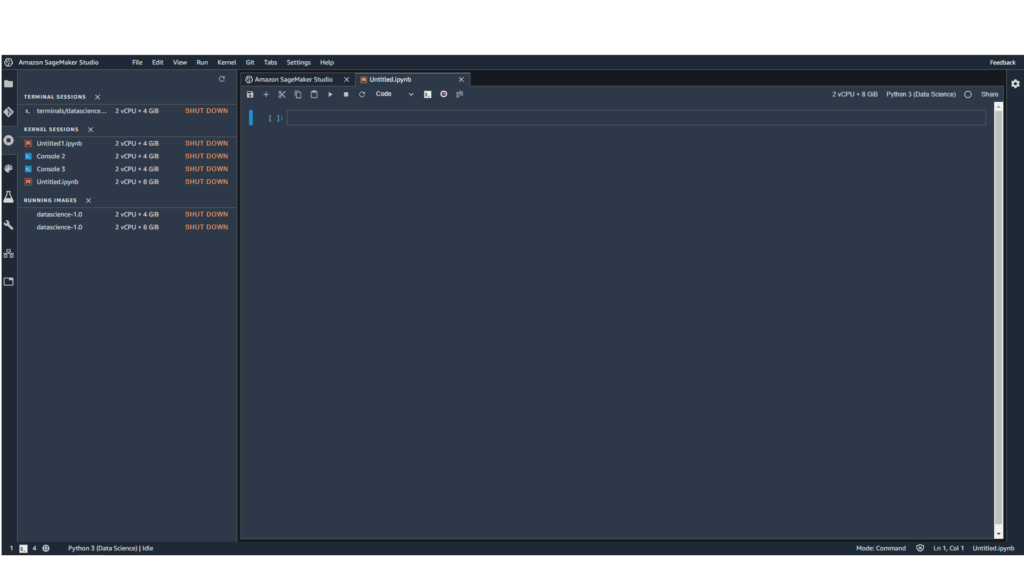
You can stop kernels and terminals independently, too, and reuse the images if you want.
Starting an interactive shell – You’ll pick an instance type, an image, and a kernel. Once launched, a new interactive shell (outside of a notebook) will be available in the IDE. By default this is Python3.
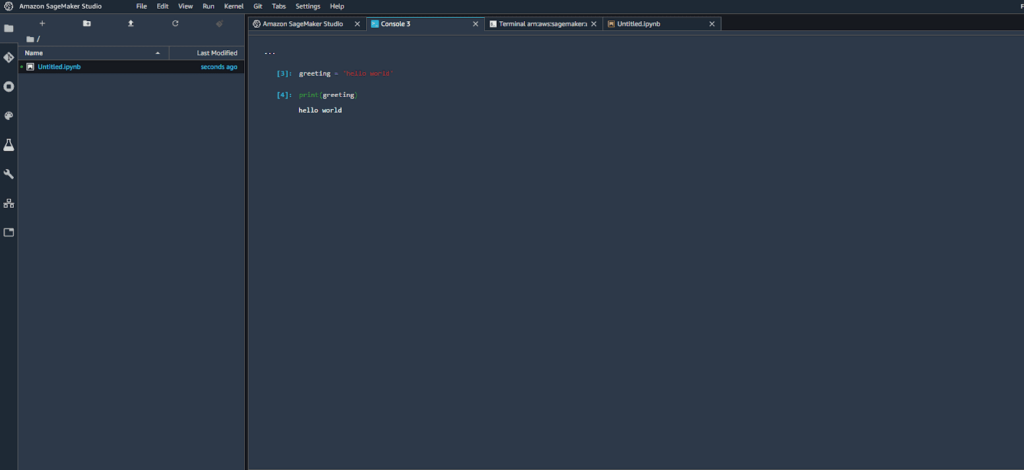
Starting an image terminal – If you need to connect directly to the instance that is running your code to install a library or configure something, you can open an image terminal.
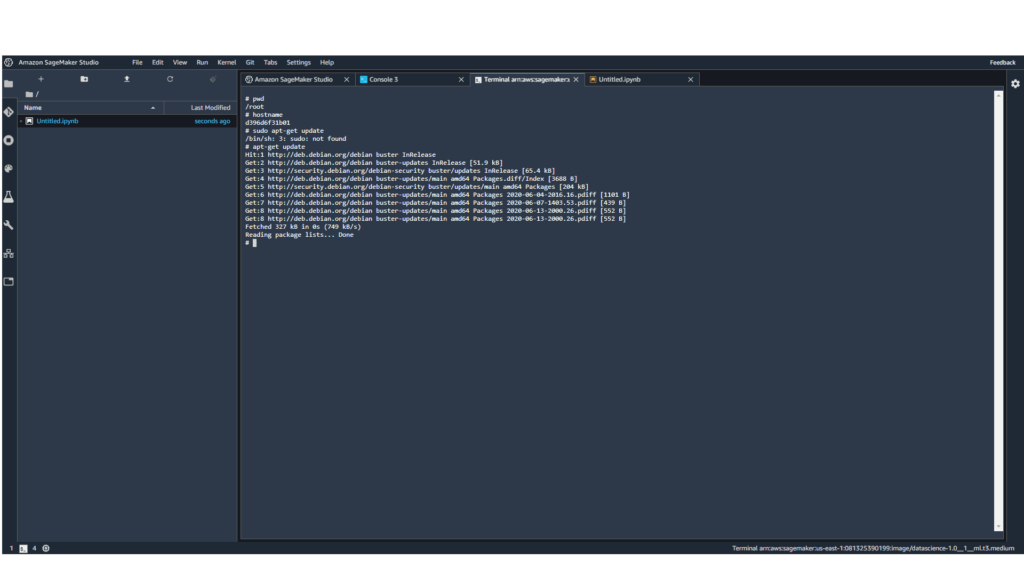
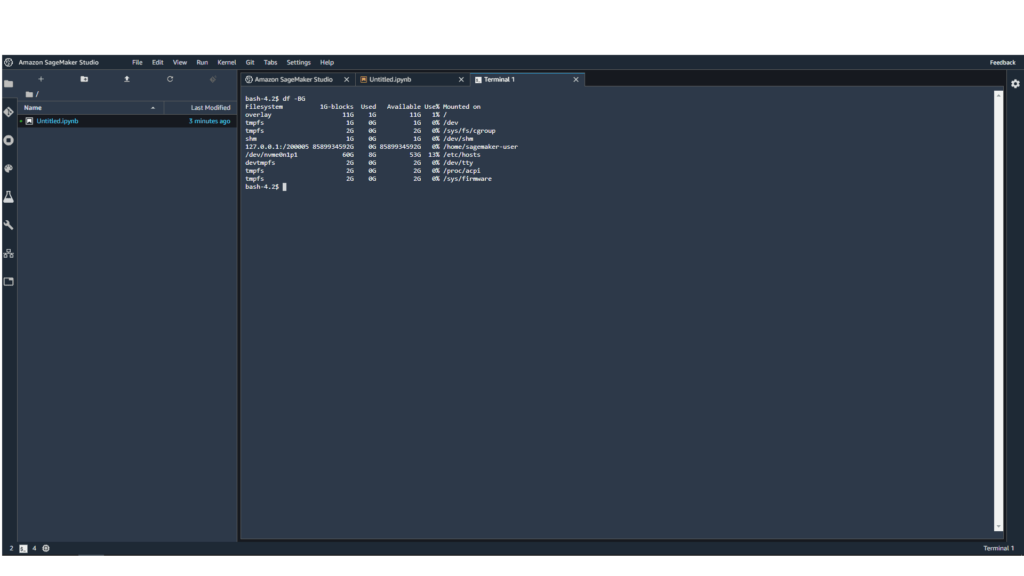
Starting a system terminal – This opens a terminal in the instance hosting your Jupyter notebook. A use case for this is, for example, interacting with your home folder through the command line, or creating custom kernel configurations.
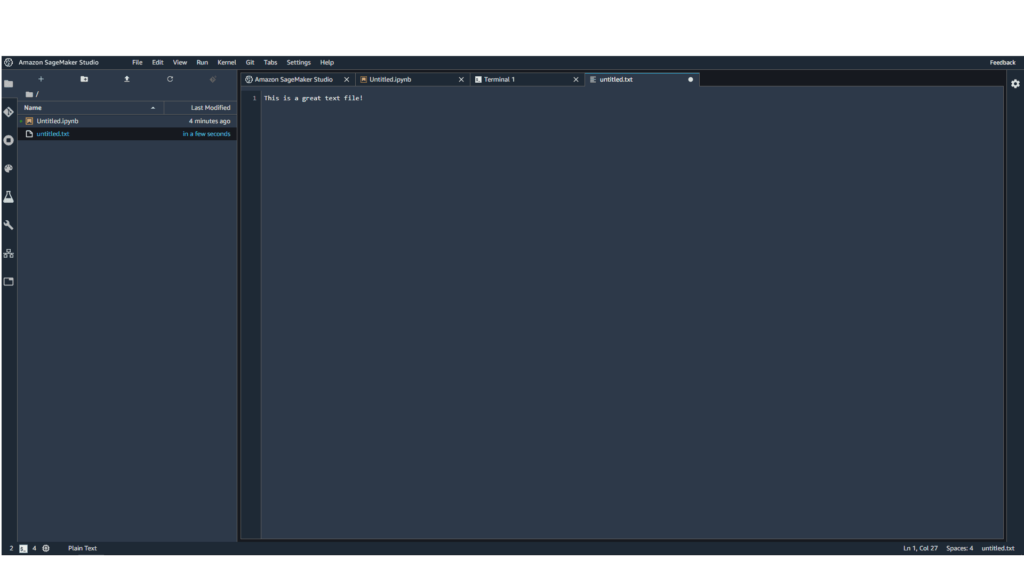
Create a new text file – If you want to edit text or markdown files, Studio gives you a handy way of creating them. By default, all files are created in the home directory.
Customizing your environment
Besides the Jupyter server running for each user, each user will be able to spin up ML-optimized instances that come pre-installed with different purpose-specific software.
When working with notebooks, we’ll be able to pick and choose:
- Instance types
- SageMaker images
- Kernels
Instance types are the size of the virtual machine that will execute our notebook code. There are many sizes to suit all your ML development needs.
Fast launch instance types are particularly interesting since they start up and shut down several times faster than regular instance types.
SageMaker images are Docker images that come prepackaged with the SageMaker SDK. Available images come with different tools to help with Data Scientist’s tasks. Images run on instances.
Kernels are runtime configurations, usable from notebooks. AWS provides different kernels to take advantage of the optimized image and hardware that kernels run on, so keep this in mind when picking yours. Kernels can also be customized.
To create your own custom kernel, simply start an instance. Then, go to File -> New Launcher -> Image terminal.
Once in the image terminal, run conda create –name <your kernel name> ipykernel
Please note that once you kill your instance, your kernel configuration is lost. So it’s better to save it to a file and recreate it whenever you need it again.
Read more about instance types, images, and kernels:
- Use Amazon SageMaker Studio Notebooks – Amazon SageMaker
- Available Instance Types – Amazon SageMaker
- Available SageMaker Images – Amazon SageMaker
- Available SageMaker Kernels – Amazon SageMaker
- Create a Custom Kernel – Amazon SageMaker
Git integration
You can clone a git repository using a system terminal through the CLI and run a regular git clone command since git comes pre-installed in system images.
You can also use the UI to clone your repository: go to Git -> Clone and paste your git project’s URL. If it’s password-protected, you’ll be prompted for your credentials.
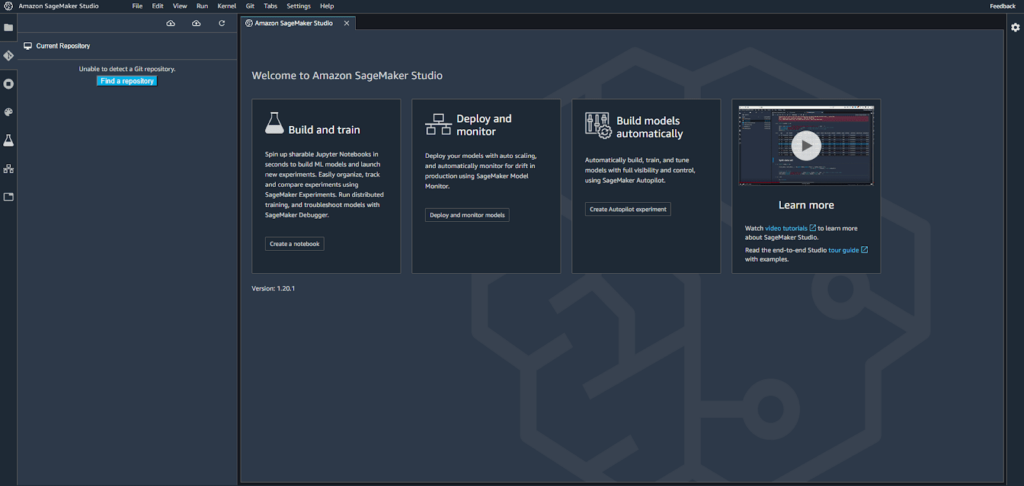
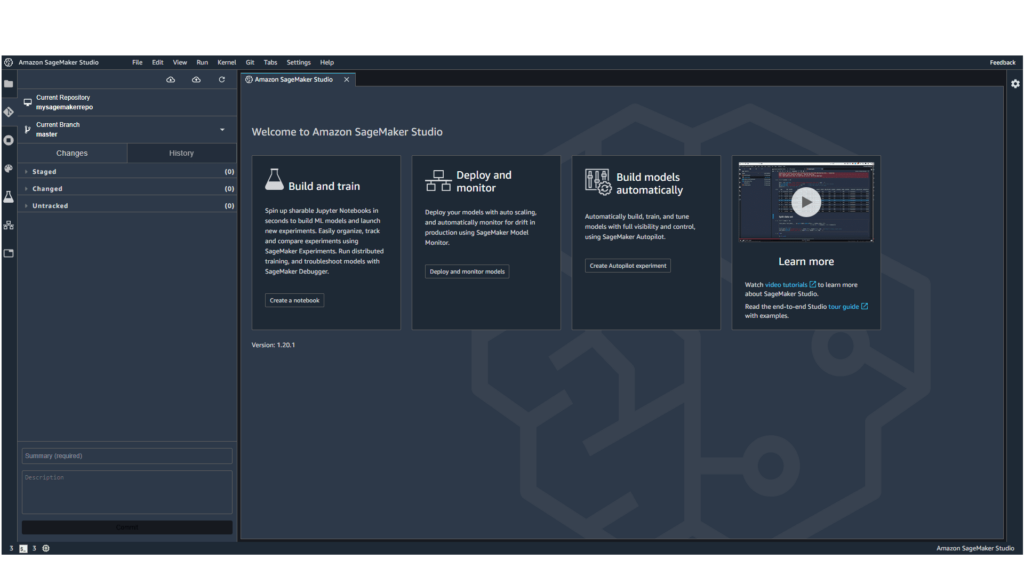
To take advantage of the UI that Studio provides for Git, you need to register your repository first. To do this, click in the Git icon in the sidebar, and then Find a repository. Click on the repo you want to register, then come back to the sidebar. You’ll be able to visually stage, reset, commit, and push changes with the convenience of a UI.
Sharing your work
We’re stronger together, and more productive as a team. When working on a data problem with notebooks, you’ll sometimes want to share your notebook file with a colleague. SageMaker Studio provides two easy ways to do so.
Sharing a notebook with another SageMaker Studio User
Sharing a notebook with another user is simple: click the Share button in the top-right corner.
Follow the dialogue and you will create a shared notebook. You can grant access to shared notebooks to your colleagues by giving them the shared notebook link.
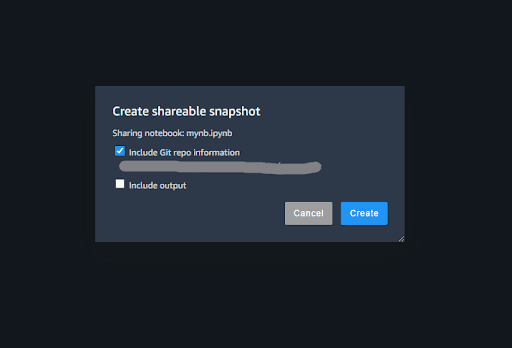
Shared notebooks are read-only. They may or may not include cell content. If the person that received the link wants to modify them, they need to create a copy of the shared notebook.
Sharing also includes the option of including the git repositories being used in development. This way, if you’re working with a colleague and need them to make a change to your code and commit it, you can provide the entire repository instead of just the files.
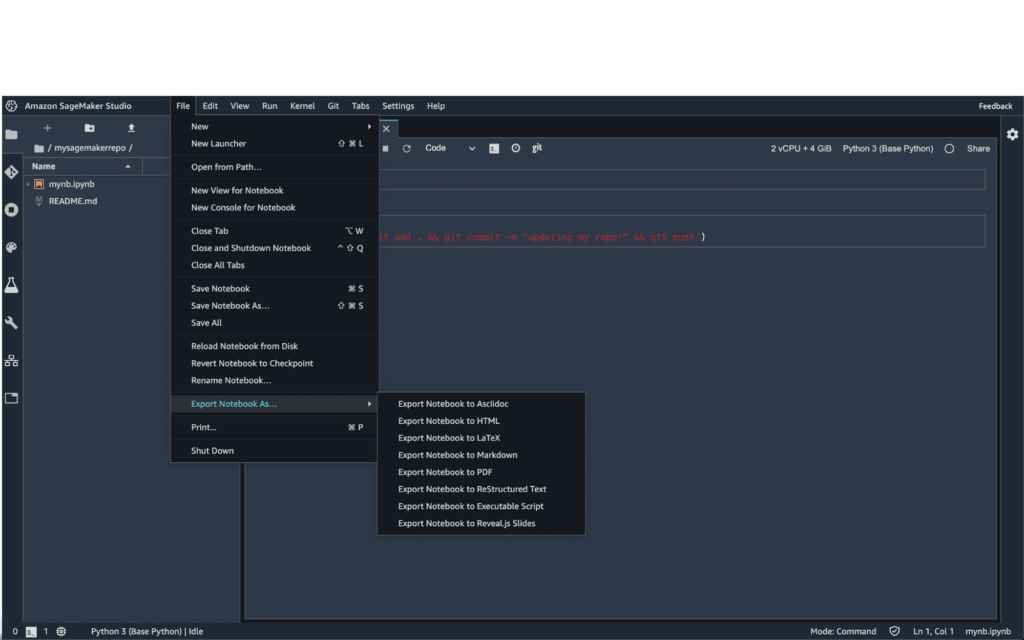
Exporting notebook
You can also share notebooks by exporting them to one of the supported file formats.
Training and experimenting
Training ML models is a highly iterative process. You need to tweak and train them several times to get a well-performing model. Keeping track of which hyperparameters, data, and code produced which model can be a daunting task. Also, at some point, we’ll need to choose the best performing model.
SageMaker Studio builds on SageMaker’s original offer to solve these two problems (tracking experiments and picking the best performing one) with modern UI tools.
As a side note: hyperparameters are parameters that are set before the model begins training and determines training behavior. Some common algorithm hyperparameters include epoch and learning rate.
Running experiments
SageMaker Studio provides an easy way to track different code, parameters, and configuration combinations. It groups training jobs, algorithms, parameters, input data output, and other metadata in a trial.
Trials are organized into named components, so you can better understand the performance of each trial. Trials are not only training. They can also have pre-processing steps. This is why trials are subdivided into trial components.
You can find an exercise that lets you train a model and use experiments while doing so here: Track and compare trials in Amazon SageMaker Studio – Amazon SageMaker
This experiment uses the smexperiments library to track training and preprocessing performance. However, that experiment takes quite a bit of time and some money since it runs several training jobs. So here’s a conceptual summary of what’s going on related with experiments in the exercise:
- First, an Experiment is created
- For each run of a training job, it creates a new Trial object.
- When running a pre-processing step, create a new Tracker object and some hard-coded preprocessing information.
- This particular experiment is using Pytorch’s estimators. After configuring estimator metrics, the name of the trial is passed as a parameter to estimator.fit() and its metrics will get automatically registered as part of that trial. It’s useful to call this trial component training or something similar.
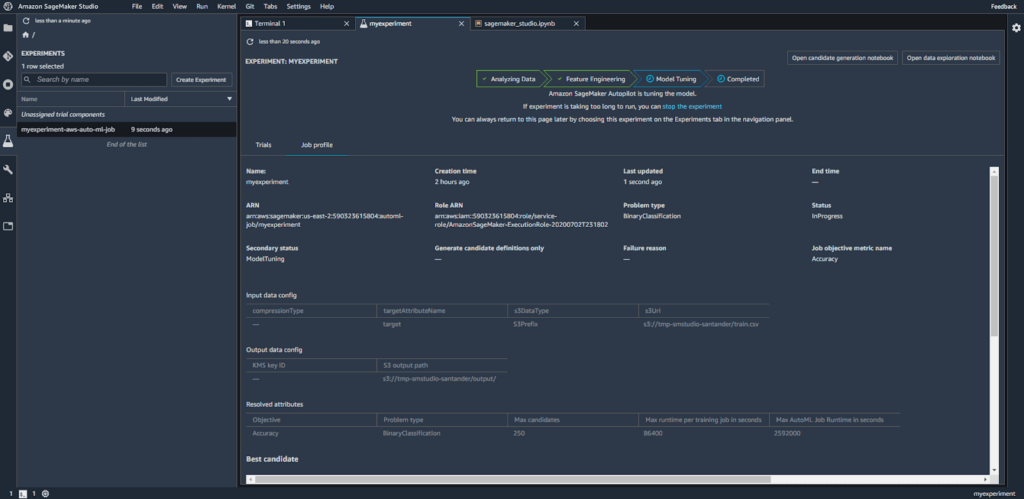
Experiments with SageMaker Autopilot and automatic model tuning
Experiments are great when doing iterative model building. But what happens when you have a range of hyperparameters that you want to test out? Automatic model tuning, in a nutshell, works as follows:
- You define a training job
- You configure your hyperparameters and the ranges that you want to test
- SageMaker will run randomly chosen combinations of values inside those ranges and run training jobs with it.
- SageMaker will then use the results of the training job to pick which set of values to use next as hyperparameters.
Read more about automatic model tuning:
- How Hyperparameter Tuning Works – Amazon SageMaker
- Perform Automatic Model Tuning – Amazon SageMaker
Monitoring you models
One of the biggest advantages of using SageMaker is the ability to deploy trained models in fully managed environments. You can monitor deployed endpoints from SageMaker Studio itself. One of the advantages of this feature is that it helps detect if our model’s performance degrades over time.
Many factors may affect a model’s accuracy, but two of the most common ones are data drift and concept drift. Data drift occurs when the training data is not representative of the population, which introduces bias to the model. Concept drift is slightly different: training data might be representative at the time of training, but the way the features are interpreted can change over time.
Read more on drift:
How monitoring works
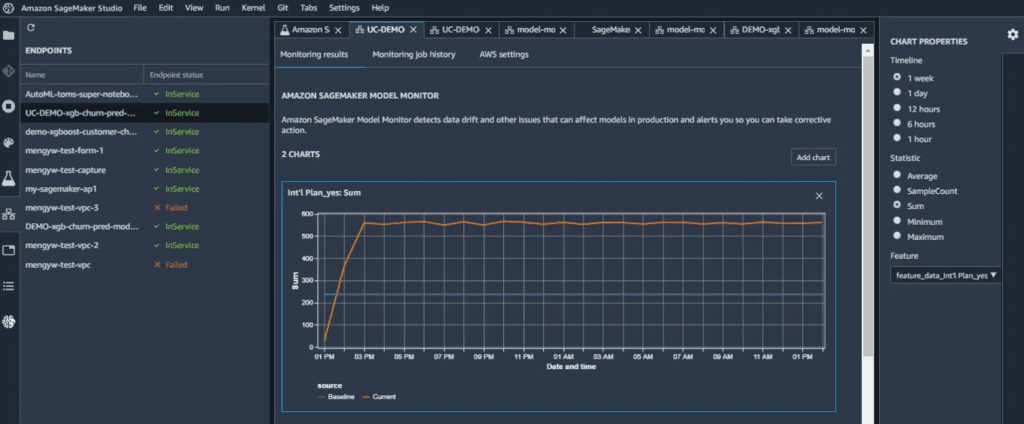
The first step is to start capturing prediction input and output, meaning both the data provided to run inference and the inference result. Both are stored in the S3. This is enabled by creating a data capture configuration and applying it to the deployed endpoint. These results are compared to a baseline, to have a benchmark of the endpoint’s accuracy. This baseline is a dataset. Usually, the training dataset is recommended to create the baseline. Creating and running a baselining job is needed once. Then, a monitoring job is created to run periodically. This compares the captured inference data with the expectations from the baseline.
The result of these monitoring jobs is accessible from the SageMaker Studio endpoint monitoring tab.
How to enable monitoring with SageMaker Studio
If you have already deployed endpoint and you want to start monitoring it from SageMaker Studio, follow these steps:
- Go to the “Endpoints” item in the sidebar and double click on the deployed endpoint you want to start monitoring.
- Click on the button “Enable monitoring”.
- A shared notebook will be opened. Click on the top-right corner button “Import notebook”.
- In the executable copy, follow the instructions in each cell.
Read more about monitoring deployed endpoints:
Cutting costs
One big difference between SageMaker Studio and other notebook environments is that it’s designed to decouple code, compute and storage. You spin up and shut down compute instances easily and seamlessly, without the need for infrastructure as code or admin privileges.
When a notebook user no longer needs it, it can simply shut down every computing resource without losing data or code.
Shutting down unused machines
If you’ve stopped using SageMaker Studio and you don’t have any long-running jobs in any backing instance, the best way to stop all compute resources is to use the following dialogue:
File -> Shutdown -> Shutdown All
Other tips to control costs
If you have access to the studio Dashboard, you can also stop instances from there. Just go into a user’s details, then click on “Delete app”. Delete is a bit ambiguous in this context though. If deleting the Jupyter server, the user’s data won’t be deleted since it’s stored independently from the instance in EFS. Everything outside of the home folder will be lost.
To monitor your user’s AWS EFS volume size, you can check your EFS dashboard and see how much it’s costing you using the EFS calculator.
Conclusion
We’ve explored the main features and core concepts of SageMaker Studio, and provided a quick look of what an integrated development environment for data looks like. We’ve also talked about how it can help us in the build stage by keeping track of experiments and improving the training experience. It can also help us maintain deployed models by providing monitoring, and keep costs down by provisioning only the infrastructure that we need at the moment we need it.
For further information please visit SageMaker Studio official documentation.


